· AIと機械学習 · 4 min read
Cloud TPU を活用した深層学習の高速化
Google Cloud TPU を使って深層学習のトレーニングとデプロイを加速する方法を解説

Cloud TPU とは
Cloud TPU (Tensor Processing Unit) は、Google が開発した AI アクセラレータです。大規模な機械学習モデルのトレーニングと推論を高速化するために特別に設計されています。
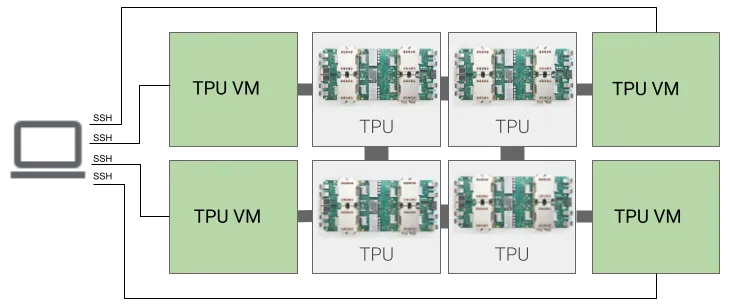
TPU の主な利点
- 高速な計算処理: 行列演算に特化した設計により、従来の GPU と比較して最大 10-50 倍の処理速度
- 優れたコスト効率: 処理速度あたりのコストが低く、大規模なモデルトレーニングに最適
- スケーラビリティ: TPU ポッドを使用することで、数千個の TPU コアまで簡単にスケールアップ可能
コスト最適化のヒント
- 前処理のオフロード: CPUで実行可能な処理はTPUから切り離す
- 自動シャットダウン: 使用していない時間帯のTPUリソースを自動停止
- TPUノードタイプの選択: ワークロードに適したTPUバージョンとサイズの選定
「Cloud TPU を使った深層学習アプリケーション開発」のチュートリアル
前提条件
- Google Cloud アカウント
- Python 3.7以上
- TensorFlow 2.x
- Google Cloud SDK
1. 環境構築
1.1 TPU VMインスタンスの作成
# TPU VMインスタンスを作成
gcloud compute tpus tpu-vm create tutorial-tpu \
    --zone=us-central1-a \
    --accelerator-type=v3-8 \
    --version=tpu-vm-tf-2.12.0

# TPU VMインスタンスにSSH接続
gcloud compute tpus tpu-vm ssh tutorial-tpu --zone=us-central1-a
1.2 Python環境のセットアップ
# 必要なパッケージのインストール
pip install tensorflow tensorflow-datasets pandas matplotlib
2. データの準備
2.1 TensorFlow Datasetsを使用したデータロード
import tensorflow as tf
import tensorflow_datasets as tfds

# ImageNetデータセットをロード
dataset, info = tfds.load('imagenet2012', with_info=True)
train_dataset, valid_dataset = dataset['train'], dataset['validation']

# データの前処理関数
def preprocess(features):
    image = tf.cast(features['image'], tf.float32) / 255.0
    label = features['label']
    return image, label

# TPU用にデータセットを最適化
BATCH_SIZE = 1024
AUTOTUNE = tf.data.experimental.AUTOTUNE

train_dataset = train_dataset.map(preprocess, num_parallel_calls=AUTOTUNE)
train_dataset = train_dataset.shuffle(10000)
train_dataset = train_dataset.batch(BATCH_SIZE)
train_dataset = train_dataset.prefetch(AUTOTUNE)
3. モデルの構築とトレーニング
3.1 TPU設定
# TPUの検出と初期化
resolver = tf.distribute.cluster_resolver.TPUClusterResolver()
tf.config.experimental_connect_to_cluster(resolver)
tf.tpu.experimental.initialize_tpu_system(resolver)

# TPU戦略の作成
strategy = tf.distribute.TPUStrategy(resolver)
3.2 モデル定義
with strategy.scope():
    model = tf.keras.Sequential([
        tf.keras.applications.ResNet50V2(
            include_top=True,
            weights=None,
            input_shape=(224, 224, 3),
            classes=1000
        ),
        tf.keras.layers.Dense(1000, activation='softmax')
    ])

    model.compile(
        optimizer=tf.keras.optimizers.Adam(learning_rate=0.001),
        loss=tf.keras.losses.SparseCategoricalCrossentropy(),
        metrics=['accuracy']
    )
3.3 トレーニング実行
history = model.fit(
    train_dataset,
    epochs=10,
    validation_data=valid_dataset,
    callbacks=[
        tf.keras.callbacks.ModelCheckpoint(
            'checkpoint/model_{epoch:02d}.h5',
            save_best_only=True
        ),
        tf.keras.callbacks.TensorBoard(log_dir='logs')
    ]
)
4. パフォーマンス最適化
4.1 データパイプラインの最適化
def optimize_dataset(dataset, batch_size):
    return (dataset
        .cache()
        .shuffle(1000)
        .batch(batch_size)
        .map(preprocess, num_parallel_calls=AUTOTUNE)
        .prefetch(AUTOTUNE))
4.2 混合精度トレーニング
policy = tf.keras.mixed_precision.Policy('mixed_bfloat16')
tf.keras.mixed_precision.set_global_policy(policy)
5. モデルのデプロイ
5.1 SavedModel形式での保存
model.save('saved_model/my_model')
5.2 Cloud AI Platformへのデプロイ
# モデルをCloud Storageにアップロード
gsutil cp -r saved_model gs://your-bucket/models/

# AI Platformでモデルをデプロイ
gcloud ai-platform models create tpu_model
gcloud ai-platform versions create v1 \
    --model=tpu_model \
    --framework=tensorflow \
    --python-version=3.7 \
    --runtime-version=2.12 \
    --origin=gs://your-bucket/models/
6. 推論の実行
def predict(image_path):
    image = tf.keras.preprocessing.image.load_img(
        image_path, target_size=(224, 224)
    )
    input_arr = tf.keras.preprocessing.image.img_to_array(image)
    input_arr = np.array([input_arr])
    predictions = model.predict(input_arr)
    return predictions
関連書籍
より詳しく学びたい方におすすめの書籍:
『エンタープライズのためのGoogle Cloud クラウドを活用したシステムの構築と運用』 https://amzn.to/3XCqham
トラブルシューティング
- TPUメモリエラーが発生した場合はバッチサイズを調整
- データパイプラインのボトルネックはプロファイリングで特定
- 学習が不安定な場合は学習率とオプティマイザーの設定を見直し
モニタリングとログ
# TensorBoardの設定
tensorboard_callback = tf.keras.callbacks.TensorBoard(
    log_dir='logs',
    histogram_freq=1,
    profile_batch='500,520'
)
書籍紹介
深層学習の基礎から実践まで学びたい方におすすめの書籍:
『Google Cloudで学ぶ生成AIアプリ開発入門』 https://amzn.to/4dvzeIN